Organic Bone Art – working with skulls
Hello! Welcome!
This is a brief-ish tutorial outlining my methods for the design and fabrication of my cow skull wall art. Any questions? you can msg me on my facebook page Elysian Element
My husband gifted me with an old cow skull he had found when working on a site in the middle of a paddock. I’m one of the rare few that gets excited about bones, so to say I was excited was an understatement. This was going to be a bucketlist build – constructing a fantasy art oddity for my wall, with no prior experience in working with these materials….custom made horns, lights, mushrooms…… it’ll be majestic…
STEP 1 –
Start the process of cleaning the skull. After hosing it off (it was pretty much buried in the ground, so she was very stained)- I bought a 5 litre bottle of hydrogen peroxide from a dry cleaning chemical supplier, I think it cost about $50.

Now in my case, i bought a 50% strength so, you have to water down the peroxide to 10% – 15% otherwise it’ll chew right through the skull and ruin it, so I had to do a few calculations to figure out how much water I needed, then found a calculator that did those quick mafs for me just to make sure i was right.. lol
Visit here for an easy to use >>> Hydrogen peroxide dilution calculator
If youre working with the same vol of peroxide as me – you will need four parts water to 1 part peroxide ( 16 litres of water to 4 litres of peroxide) Thats 20litres of goodness that will definitely make a dirty skull glow. I left it soaking for 24 hours and to be honest I was shocked at how well it came out. Despite looking a little brown whilst still wet, once dry, she’s as white as well, er…bone.
Organic Art – working with skulls
STEP 2 –
Now I went straight into plotting out how and where i was going to apply a mossy effect, – I initially was just going to buy that scrappy plastic moss- which i did- but i also invested in a static grass machine which uses static flocking to create a mossy effect. ( like $35 – $50 on Amazon)
I actually took photos of the skull and coloured in digitally where i was considering the moss placement – good idea it turns out coz i realised i was going to need to paint a green surface underneath the moss before i applied it to create a more realistic blended application. Its literally just apply the glue, attach the electronic lead close to where the grass is being applied and hit the button. ITs actually a pretty neat device and one i’m looking forward to using again!
Organic Art – working with skulls
STEP 3 –
making little mushrooms out of polymer clay. I used ta mix of Sculpey & Fimo Polymer Clay as I wanted to use glow in the dark clay and the Fimo brand had more than one colour. I ended up making a mix of transparent Sculpey clay and the fimo Glow Clay as the glow on its own was quite a noticeable colour and i wanted the mushrooms to appear a little more neutral before giving away their glow ability. It was a little tricky as one of the working the clay together as the Fimo brand was quite hard. But I ended up with a maleable product and pretty much just winged the whole process of making the shrooms just off the top of my head.
I will say tho, that making the stalks and the heads separate to one another is beneficial, just glue the caps onto the stems after baking with Gorilla Gel Glue
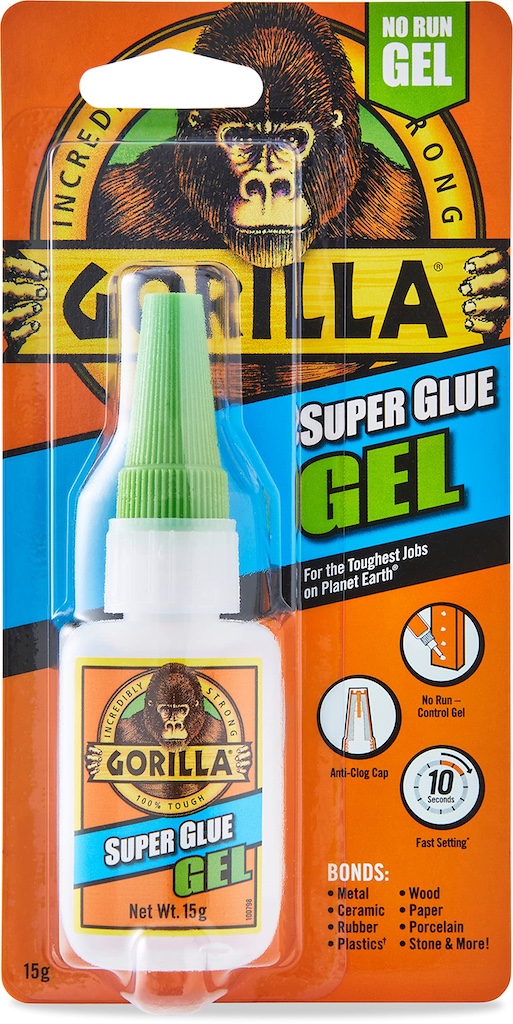
<<<<<Gorilla Gel Glue
This is the glue youre going to want- Its difficult finding the right adhesive for porous surfaces like bone. Best choices are Cement glue or this. It holds the tiny mushrooms with ease as well as the solid crystal chunks I attached that are literally defying gravity. That glue works AWESOME…
STEP 4 –
Now for the biggest job the horns. I LOVE horns and cow or not, she was getting a set, a custom set of massive ram horns. The process for this is straightforward and a lot easier when you already had a horn template ebook squirreled away waiting for me to do something with it lol – I think the book was about $30 from Kamuicosplay and has about 5 different horn templates to work with. The horns are constructed using 5mm Eva foam and cement glue – Dont be like me and decide to make them without the correct materials…Super glue and 3mm eva foam do not good horns make- they will be crooked, kinda crispy, flimsy and kinda just disappointing in the end, but it made for great practise!.
You gotta use the 5mm and you gotta use the cement glue- you know the yellow stuff that stinks to the higher hells- but ngl that stuff is critical for gluing Eva. Apply the glue to both sides of your joining pieces and wait for it to dry- like touch dry, and then push the pieces together, and I shit you not, that mofo will stay together forever. You don’t need to hold it in place, just push together firmly and she’ll never separate EVER!
Unfortunately i didnt take any process photos of the build there – thats my bad, but I do have the next steps which are building up a more realistic appearance and texture before sealing in preparation for painting.
To create a realistic-ish surface and texture, I ended up using some half circle lengths of Eva and gluing around the circumference of the horns from base to tip. I then used Eva foam clay to fill in all the seams and smooth over joins and fill out areas that are too angular. I used a dremel to tidy up any lumps and bumps when it was FINALLY dry. Eva Foam clay is like juggling a selfaware slime creature that has stickiness as a super power. – it requires some dexterity and alot of patience, just dont use too much water….she gets slippery and the drying process will take alot longer..
Plastidip is the way to go for sealing EVA foam. (Eva foam is too absorbent to be painted directly successfully or satisfactorily so you need to do a plastidip coating to allow you to paint in your desired colours. I used about 3 coats.
STEP 5 –
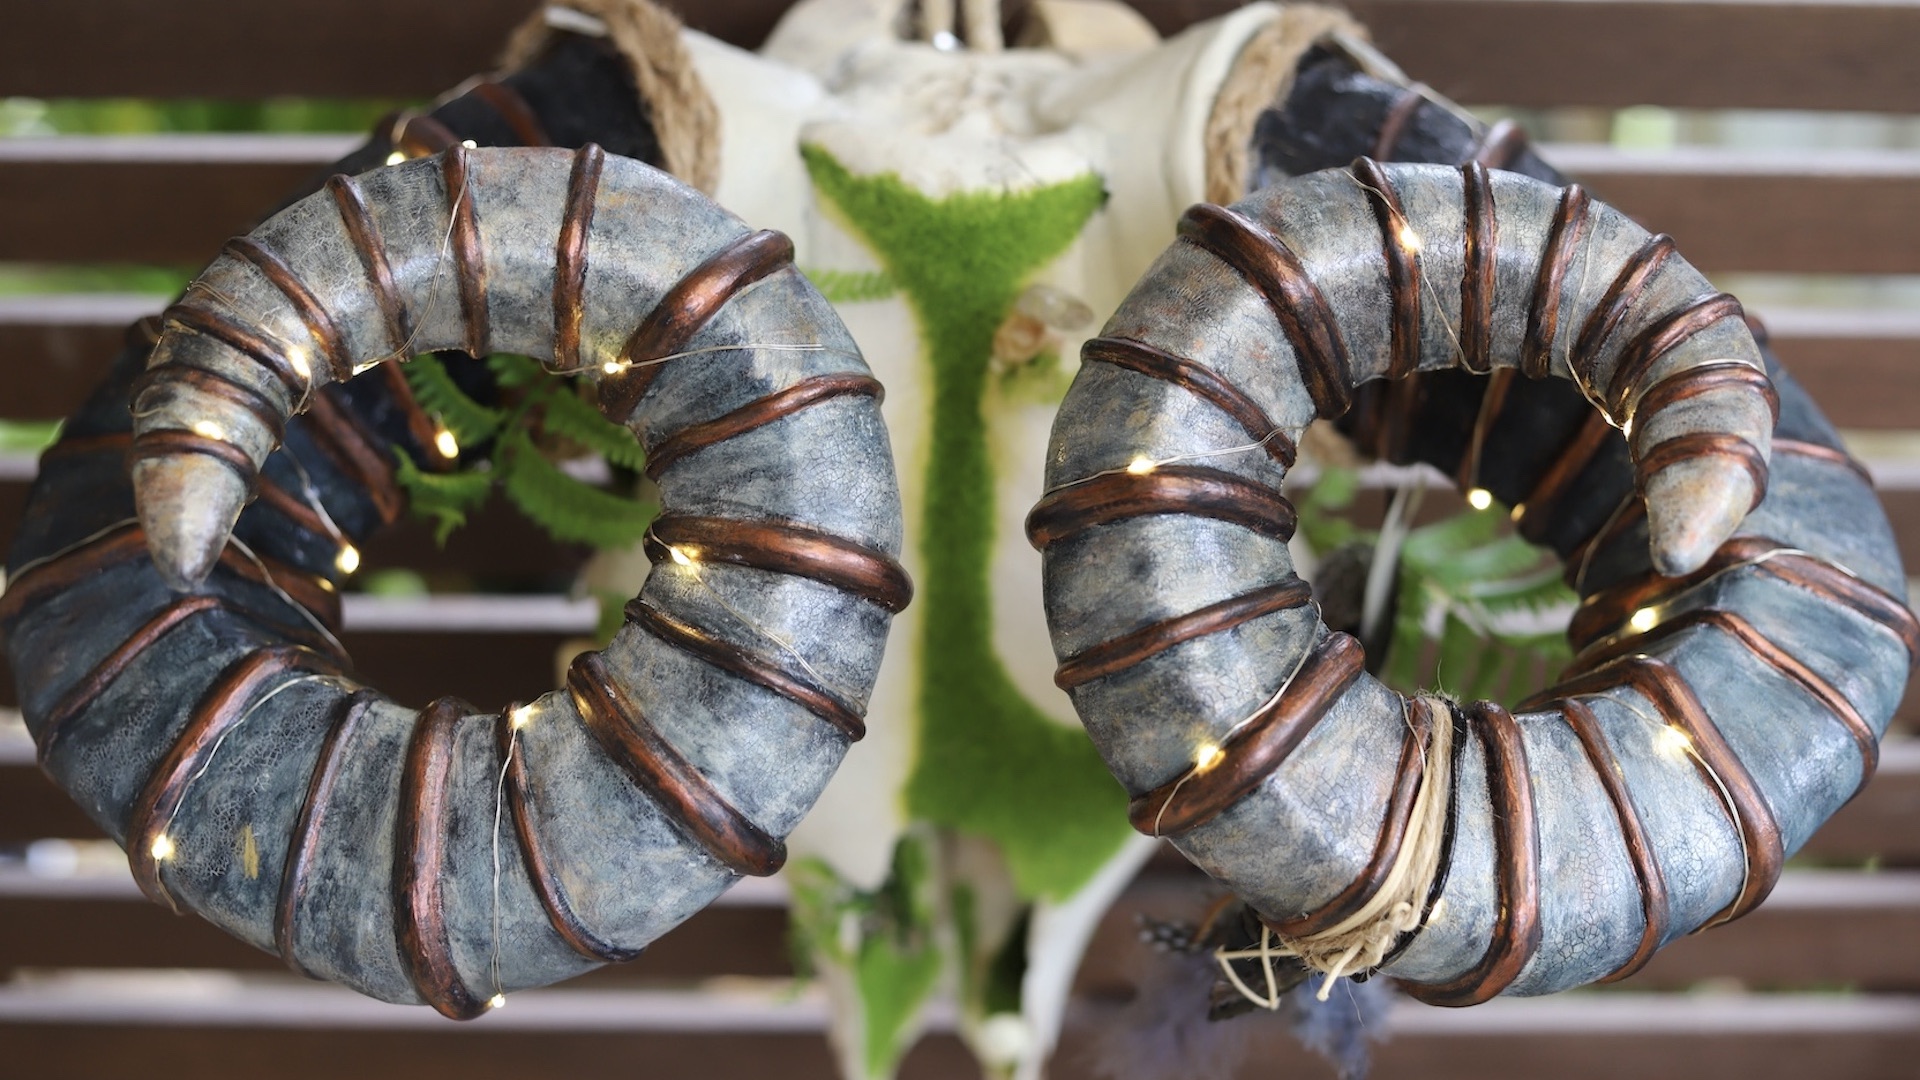
Now is time to paint! You can use acrylics on plastidip so I actually ended up doing a textural metallic fusion by painting a blend of pearlescent, copper, and deep blue black transitioning from darker at the base, to slightly lighter at the tip. I used a crackling medium over the top to induce a textured cracked glass look, and used a cloth to brush on a light pearlescent acrylic that highlighted the crackle medium. The application was pretty messy procedurally,it started with an inkling of what i thought i wanted, and then changed as i worked and evolved into these metallic marvels! It was essentially a whole lot of rubbing different shades of paint on with rags and then more paint and more crackle-then painted the rings on the horns copper as a final touch – despite there being some time since working with acrylics its good to know i have’nt lost my touch!
STEP 6 –
This is where there was a BIG gap in the project as I realised I would need to fabricate some way to connect the horns to a skull that wasn’t designed for horns. So it essentially sat on my desk unfinished- empty eye sockets boring a hole in me everytime i entered my studio! hahaha, It took a bit of pondering but my solution really ended up working fucking amazing and all you need is more eva foam, cement glue, some more eva foam clay and rare earth magnets.
The goal -fill the void that existed between the skull and the base of the horn and essentially taking Eva foam, cutting out thick rings, layering and gluing them together til it was about a 5cm or so thick. This was then held against the skull and carved away until it sat against the skull, whilst holding the horns in the right position. It was a spur of the moment idea so I didn’t catalogue it but my next set I definitely will. Once again – eva foam to build up and smooth the surface and then I glued rare earth magnets to both surfaces UNDER a layer of eva foam. Now rare earth magnets are fucking strong, and breakable- so you dont want them clanging together. I just trialled a couple of pieces of eva between a couple of magnets to see how strong the hold would be, then glued them in placed with a foam divider between each magnet. This eases the magnetism and makes separation easier and also conceals them.
Honestly- It freaking worked perfectly and even I am surprised by my own ingenuity there…
STEP 7 –
And here we are at the final stage! Once the paint had dried and cured long enough, I found two small lengths of tiny copper wire fairy lights that I ended up wrapping around each of the horns. The battery backs are concealed inside each of the horns and held in place with a of hook and loop command strip attachment for easy removal for battery changes. I have a collection of oddities and organic pretties at my disposal so i ended up hanging a totem of sorts from a horn consisting of a rabbit skull and some feathers and leather straps. A Sturdy rope is also woven into the skull at the back and actually tied through the skull for hanging on the wall..
But there you have it! One of the more challenging projects I have done in a while, being that most of the materials were first time experiences – Static flocking application, bleaching skulls with peroxide, working with Eva foam clay, building structural elements using foam sheets, and making polymer clay mushrooms. I intend to make more of these so will do a more step by step process with the next one.
Thanks for reading this far! if you have, please drop me an email and tell me what you think!